


How to get an Application Key
-
Log into getmcss.com, if it's your first time creating an application key read our how to start guide
-
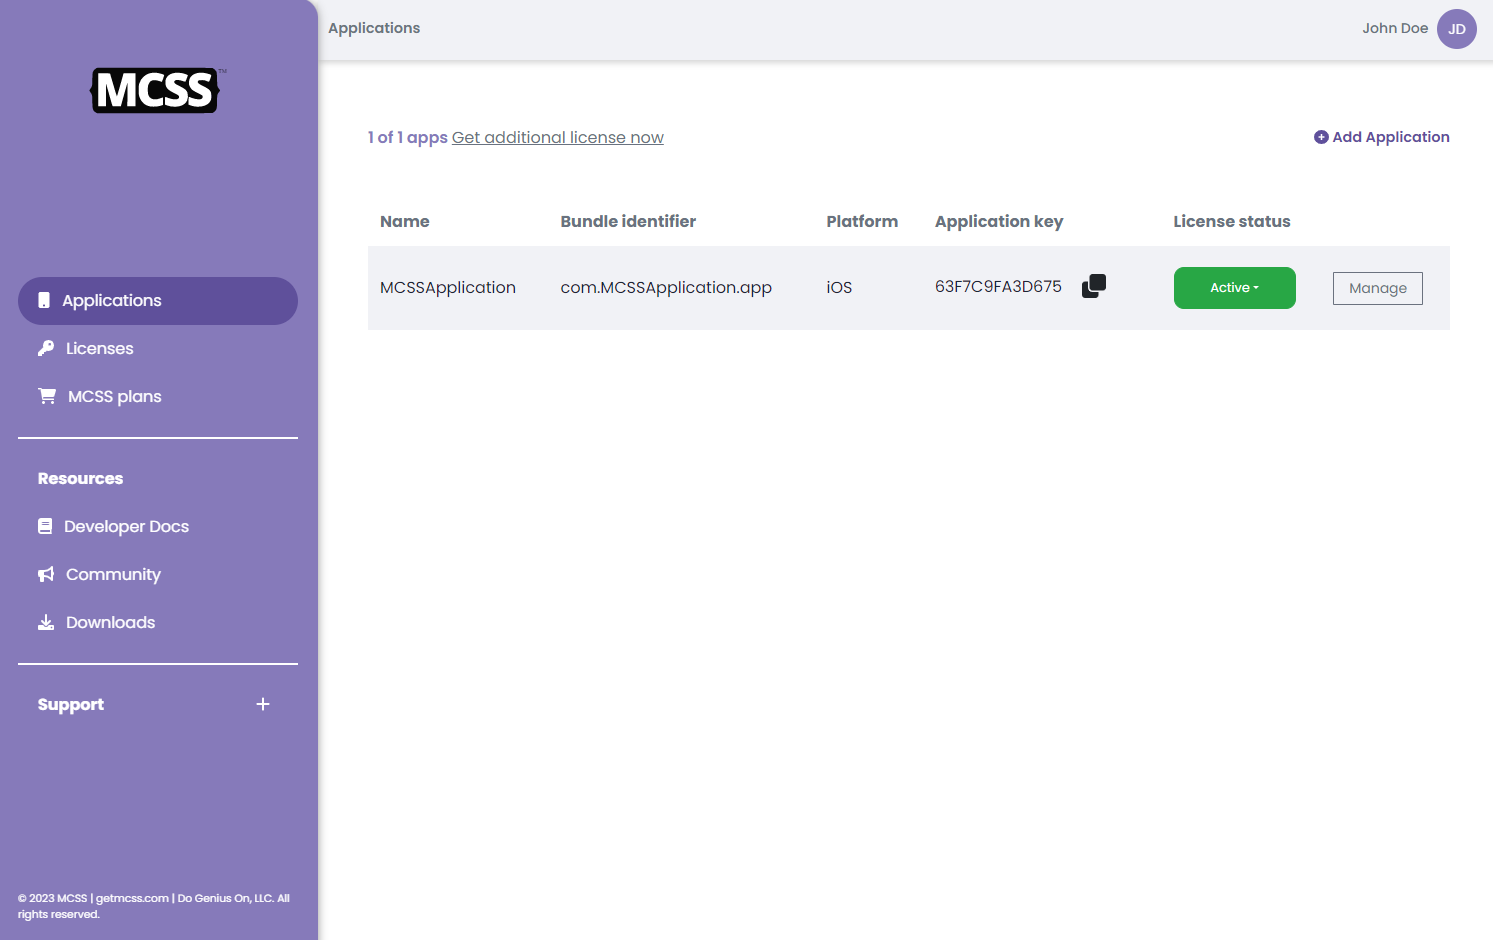
Choose the "Applications" section in the Main Menu and click "Add Application".
-
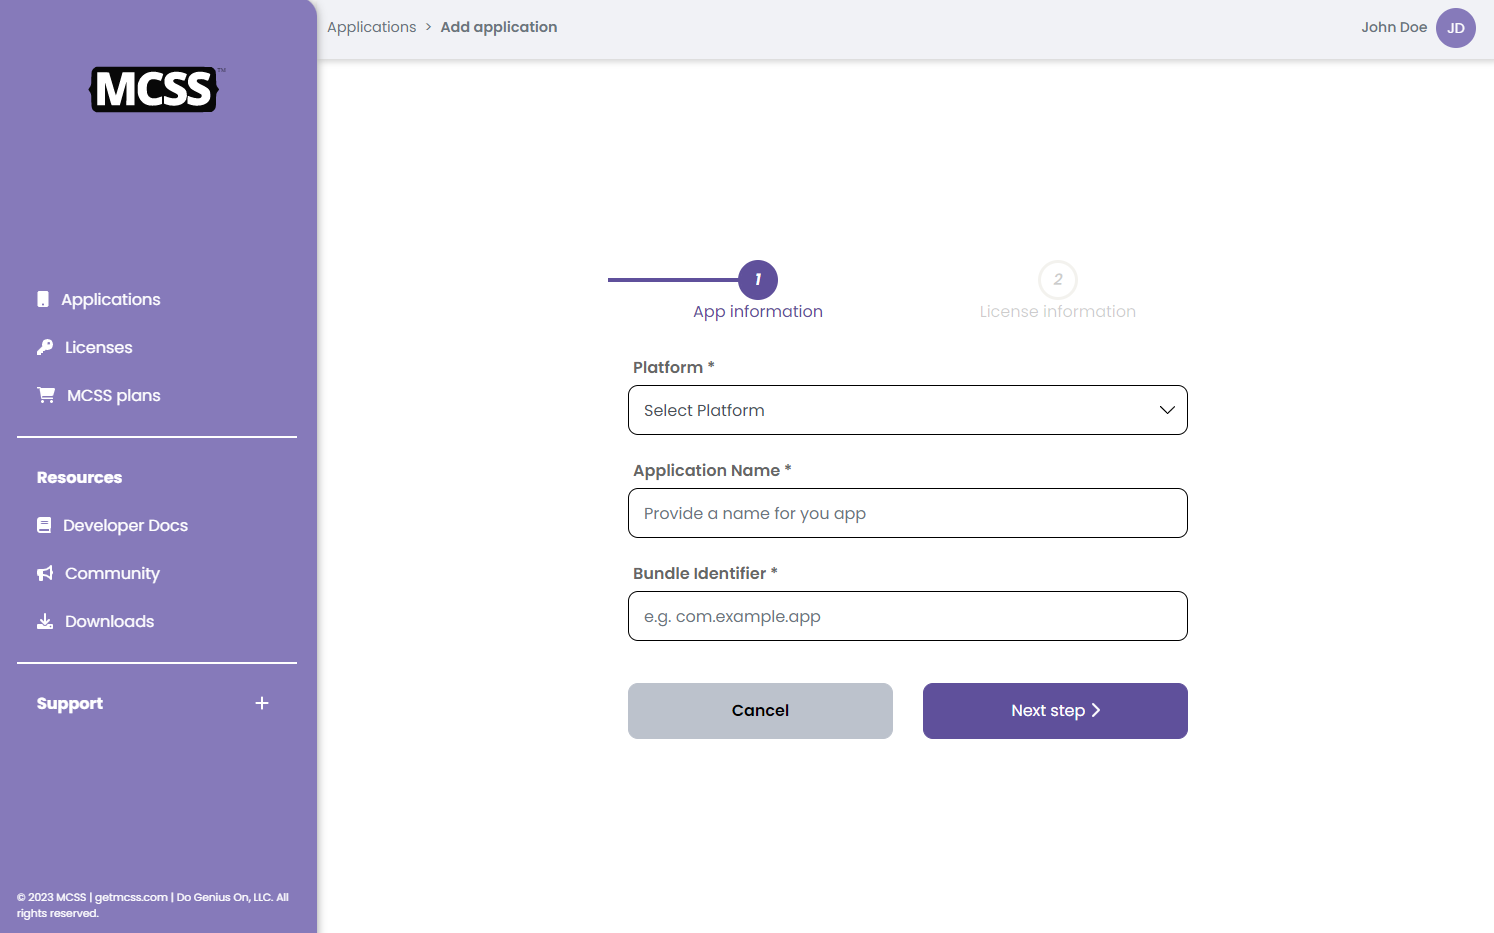
Fill out the form to register a new APP, select the platform (iOS or Android) provide the bundle identifier used in your Application Project and click "Next Step".
-
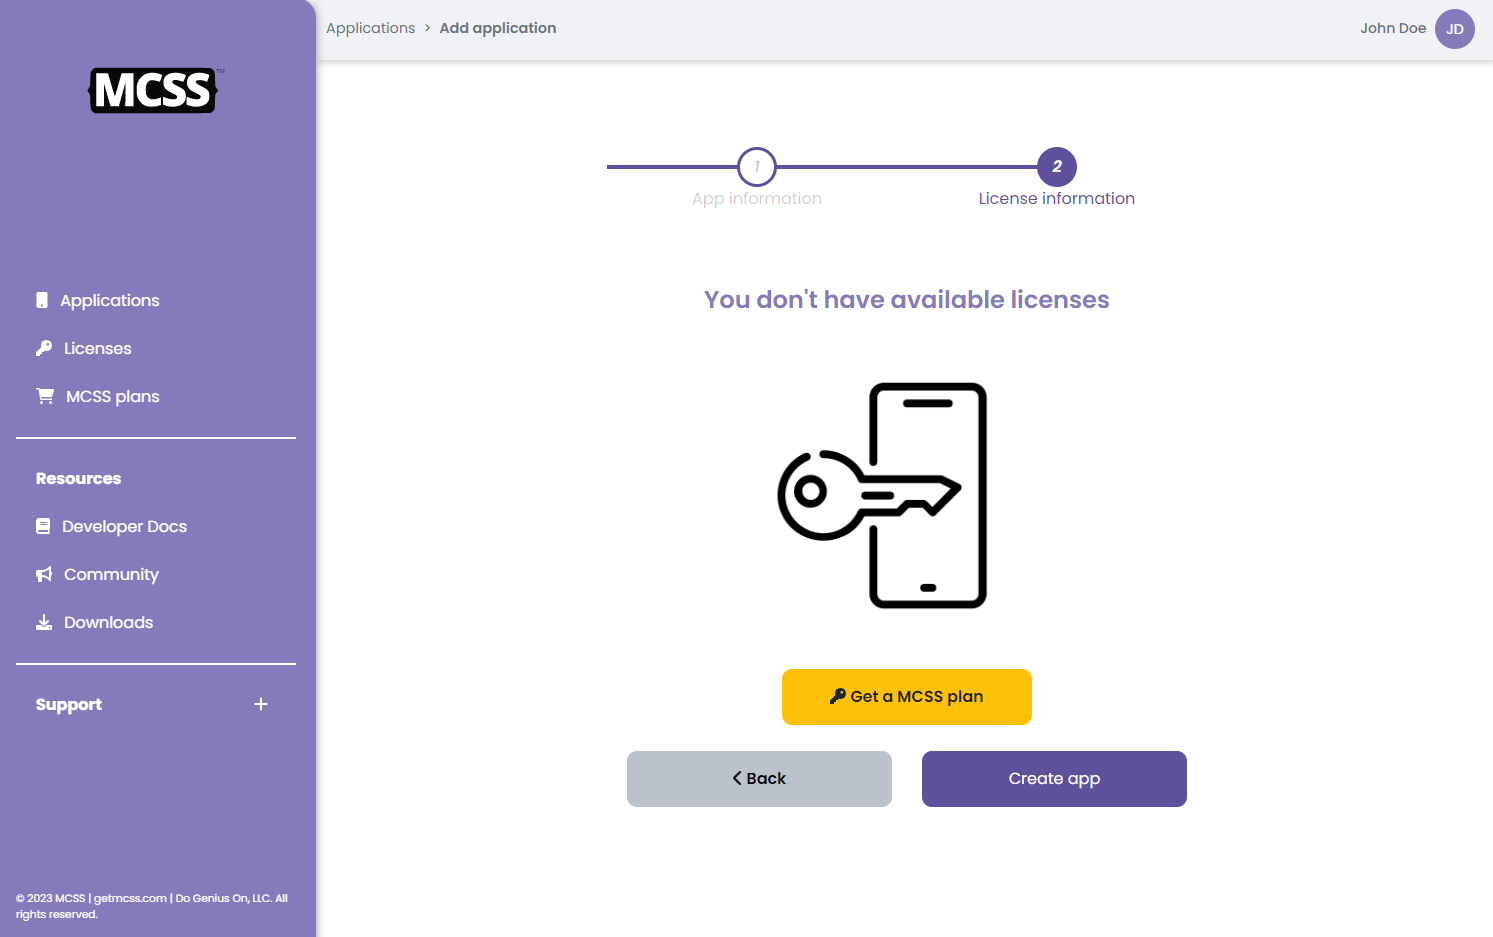
If you don't have a valid license, click on "Get a MCSS plan" and follow the prompts to purchase a new license.
-
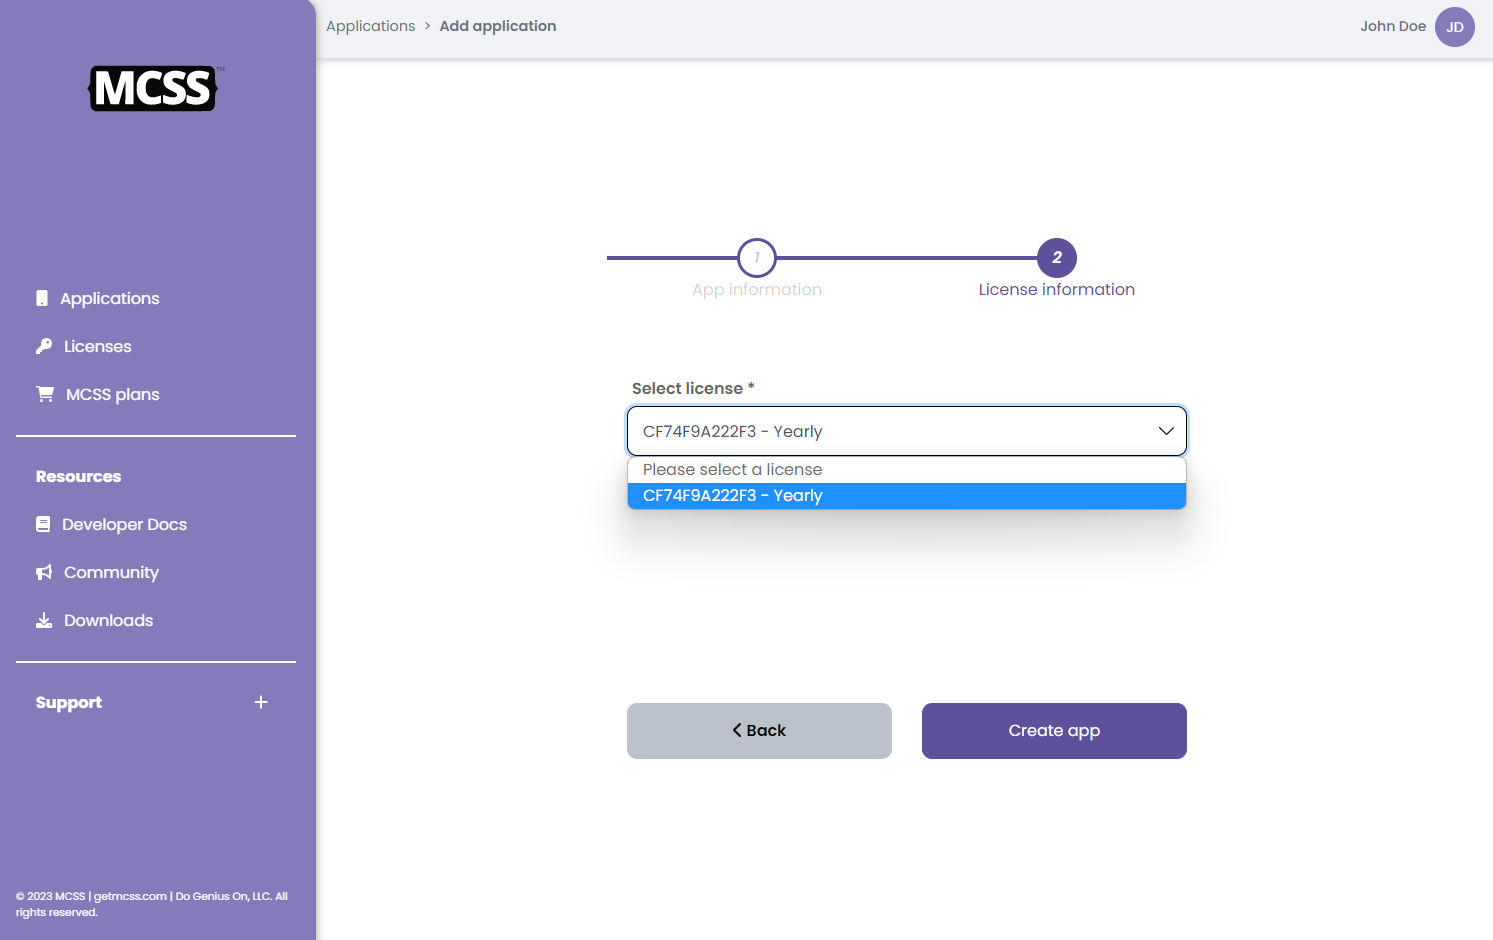
Else choose one of your available licenses and click "Create app".
-
Copy the Application Key to paste it in your project.

-
Download and integrate MCSS Installation Guide
-
Go to your application project and initialize MCSS using the obtained Application Key.
iOS: Go to your AppDelegate.swift import MCSSFramework, initialize MCSS on the application:didFinishLaunchingWithOptions:
func application(_ application: UIApplication,
                didFinishLaunchingWithOptions launchOptions: [NSObject: AnyObject]?) -> Bool {
  ...
  MCSS.shared.initialize(withKey: "63F7C9FA3D675")
  ...
}
Android: On the onCreate method of your mainActivity first before other MCSS functions, call the initialize method providing a valid MCSS Application Key (How to get an Application Key?)
public class MainActivity extends AppCompatActivity { public static final String MCSS_TOKEN = "63F7C9FA3D675"; @Override protected void onCreate(Bundle savedInstanceState) { super.onCreate(saveInstanceState); setContentView(R.layout.activity_main); MCSS.getInstance().initialize(Contex: this, MCSS_TOKEN); } } -
That's All!. Now you can create your MCSS implementation and run it on a simulator or physical devices
Swift for iOS
1. Initialize the Framework
- Go to your AppDelegate.swift and import MCSSFramework
- On the application:didFinishLaunchingWithOptions: method and first of Any other MCSS function, call the initialize method providing a valid MCSS Application Key (How to get an Application Key?)
import MCSSFramework
func application(_ application: UIApplication,
    didFinishLaunchingWithOptions launchOptions: [NSObject: AnyObject]?) -> Bool {
    ...
    MCSS.shared.initialize(withKey: "Application_Key")
    …
}
2. Select a Theme and/or create your own MCSS file
MCSS allows you add multiple MCSS files so you can organize your rules as you desire. The rules are going to be applied in the same order as you provide them, but taking in account the CSS priority standards.
In other hand, you can only select one theme for your project but is not necessary select one if you prefer create your own design completely.
If you select a theme and some MCSS files, the order will be the theme first (independent of the order as you added it) and below the list of mcss files.
The functions to select a theme and add MCSS files needs to be declared on the application:didFinishLaunchingWithOptions: method below the MCSS Initialization.
Adding a theme
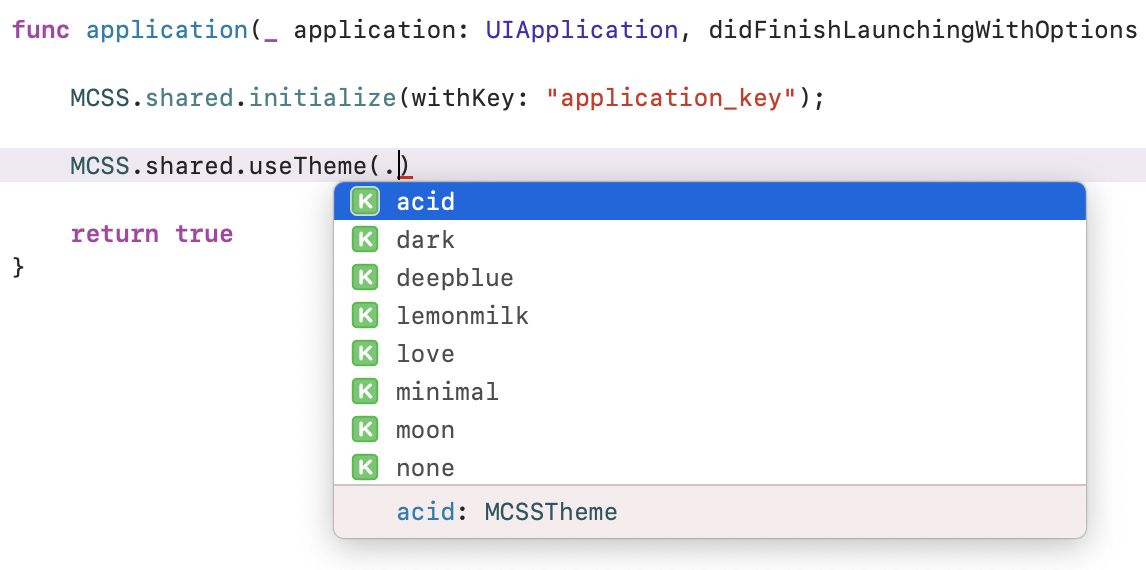
To select a theme you can use the function: useTheme:named indicating the name of the desired theme (View all available themes)
MCSS.shared.useTheme(named: "moon")
We also provide you an autocomplete function but as we will adding themes constantly may be not all of the themes will be available using this method. You are free to use this method but we recommend you time to time take a look of our Themes gallery.
Adding a local MCSS file
- Choose on the menu the option File/new/file... select an empty file in the other section and add a name with the extension .mcss.css or drag and drop the MCSS file to the project. Make sure the "copy items if needed" option is checked.
- On the MCSS file write the rules needed to create your desired design (Read about the MCSS Syntax)
- Now in your app delegate call the function addStyleSheet:fromFile indicating the name of your file
MCSS.shared.addStyleSheet(fromFile: "style.mcss.css")
Adding an external MCSS file via URL
- You will need to create a MCSS file in a public server the file needs have the extension .mcss.css, .css or .mcss, be sure the file can be accessed publicly, we recommend you use a https url, if you dont have a valid ssl certificate, you will need to edit your info.plist to allow insecure http loads.
- Now in your app delegate call the function addStyleSheet:fromURL indicating the full path to your file:
MCSS.shared.addStyleSheet(fromUrl: "https://www.myapphost.com/design/style.mcss.css")
The functions to select a theme and add MCSS files needs to be declared on the application:didFinishLaunchingWithOptions: method below the MCSS Initialization as in the example show below:
import MCSSFramework
func application(_ application: UIApplication,
                 didFinishLaunchingWithOptions launchOptions: [NSObject: AnyObject]?) -> Bool {
    ...
    MCSS.shared.initialize(withKey: "FG43MBZ00F")
    MCSS.shared.useTheme(named: "pet")
    MCSS.shared.addStyleSheet(fromFile: "basics.mcss.css")
    MCSS.shared.addStyleSheet(fromURL: "https://www.myapphost.com/design/layout.mcss.css")
    MCSS.shared.addStyleSheet(fromURL: "https://www.myapphost.com/design/style.mcss.css")
    …
}
3. Identify your components
You will need to indicate the classes and ids of your compoents to refer them from the MCSS files and to approach to full the selected theme.
The component identification can be done from the file inspector clicking on a component and editing the MCSS Properties
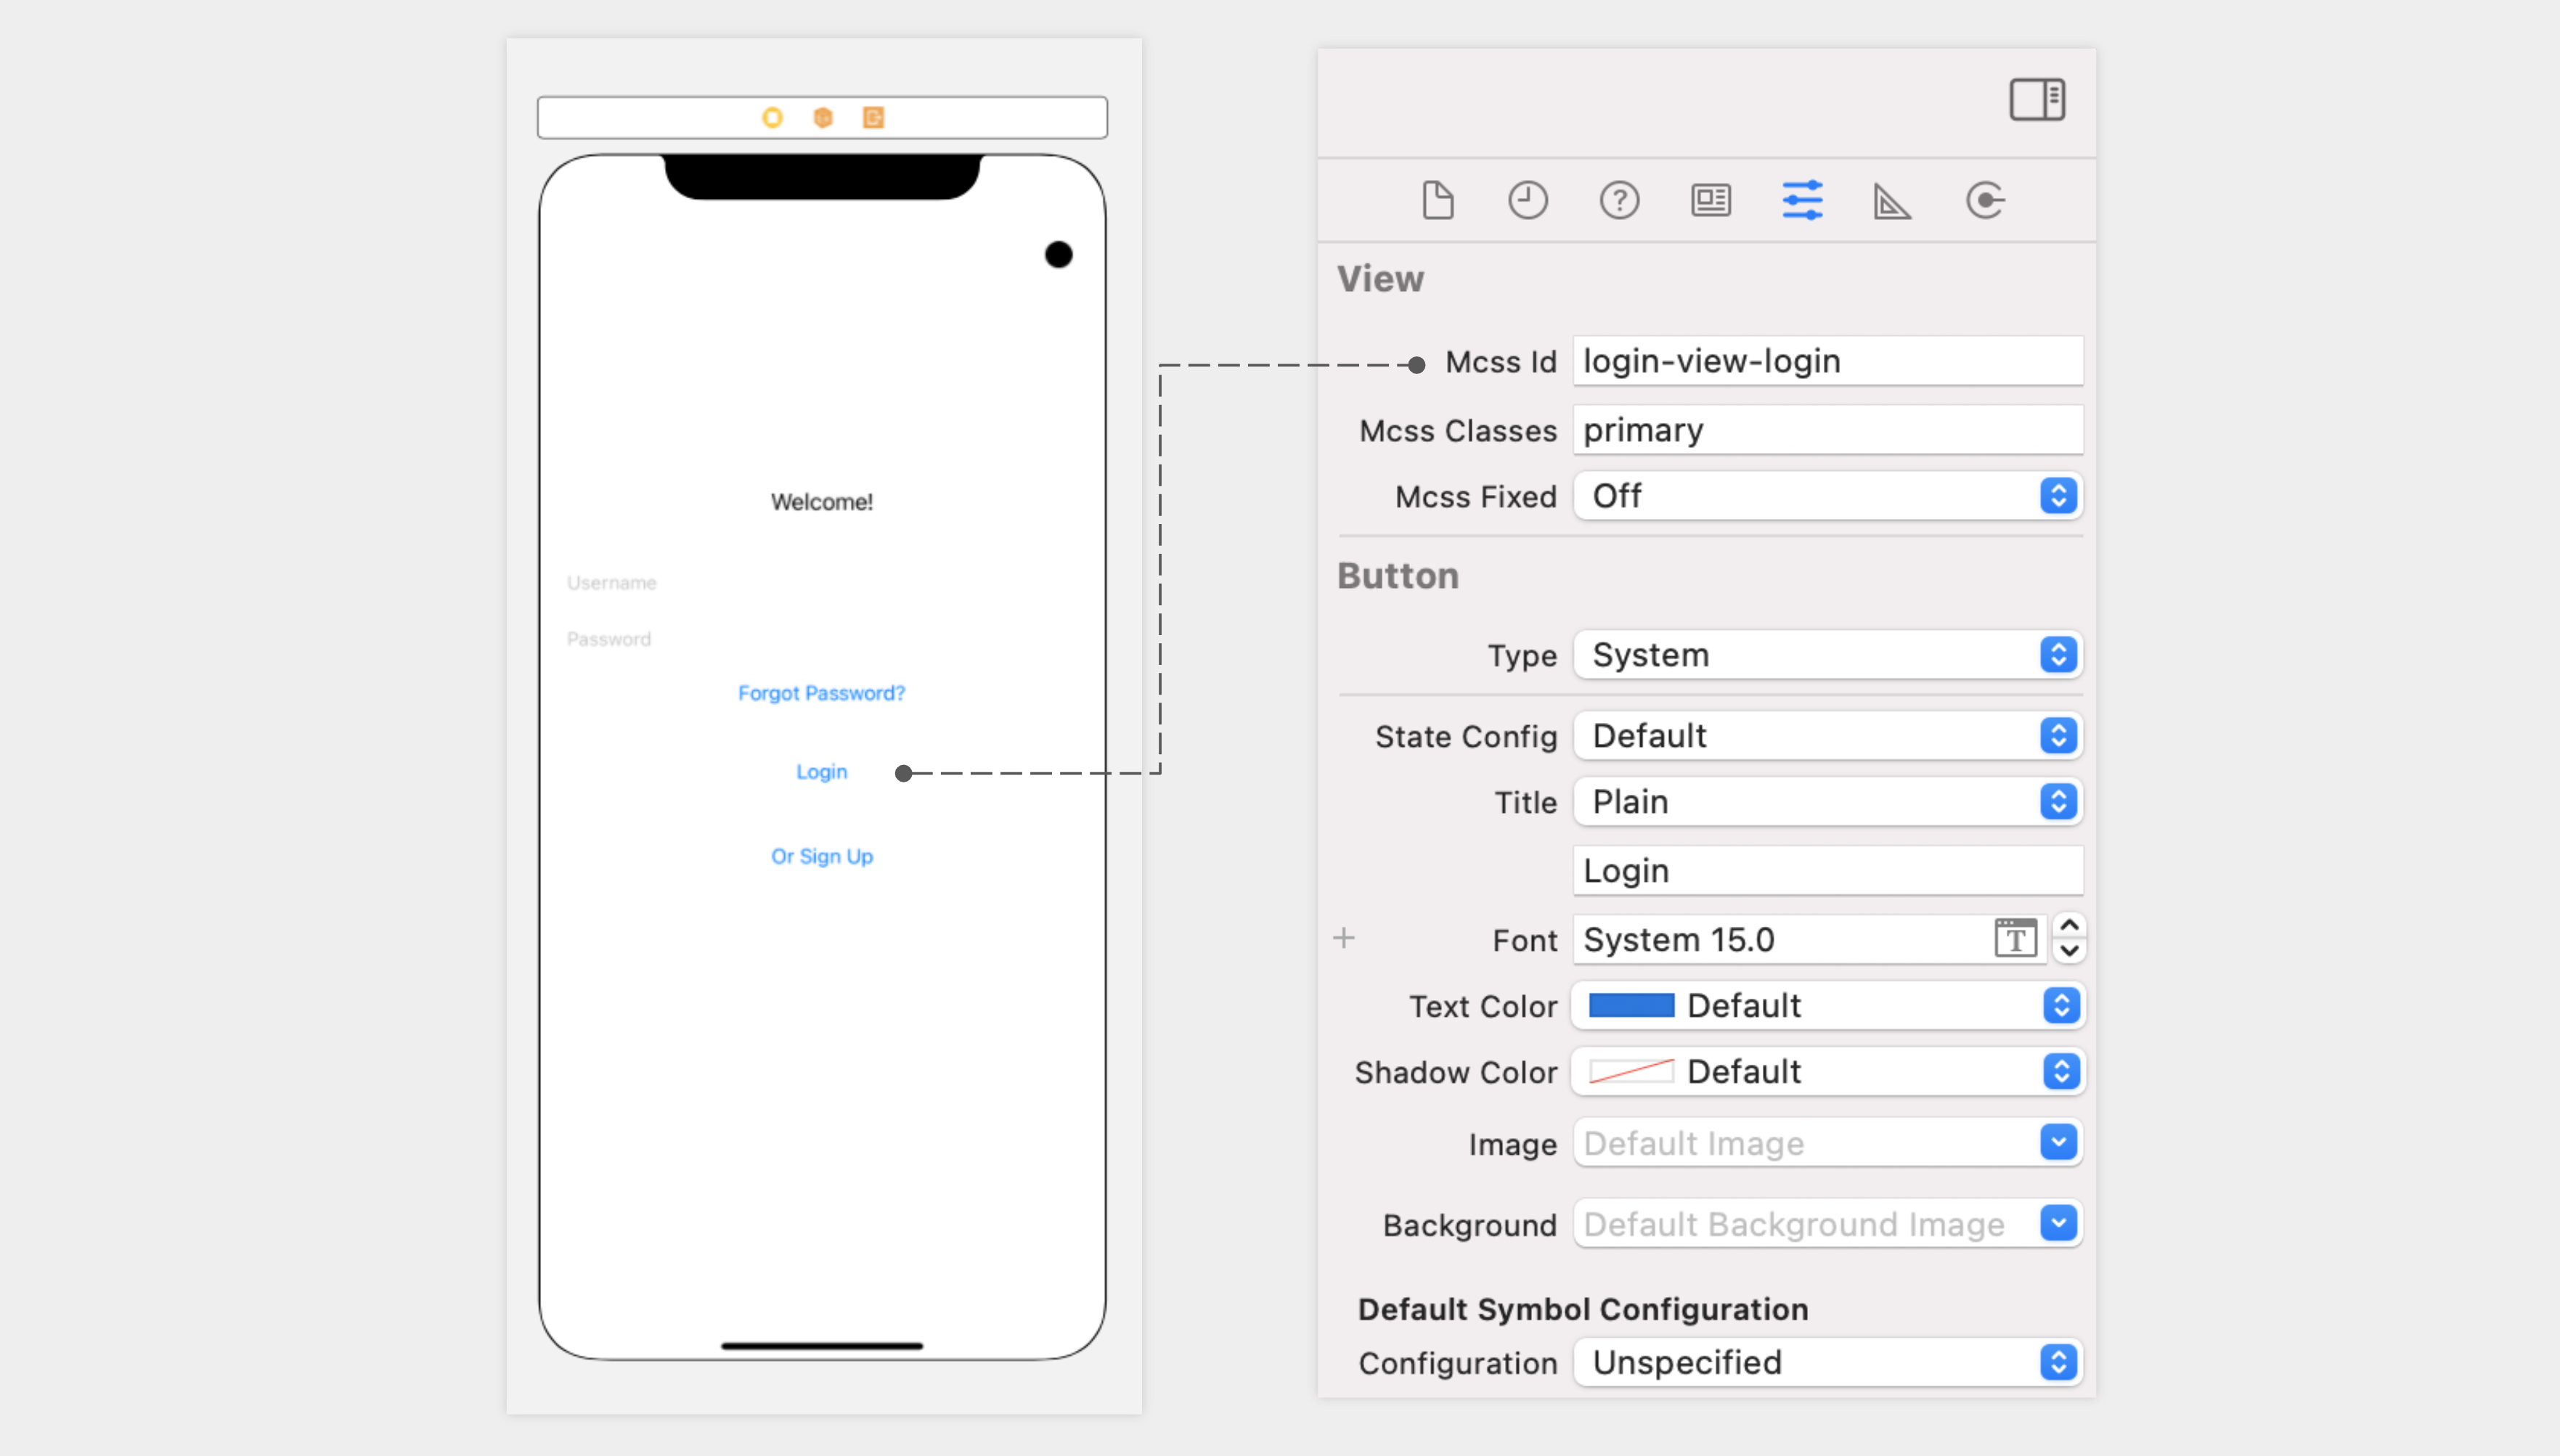
Or you can do it programmatically on the viewdiLoad method of a ViewController it is useful when you can apply the design to a component created dynamically.
import MCSSFramework
func viewDidLoad() {
    ...
    self.loginButton.mcss.id = "login-button"
    self.loginButton.mcss.classes = "rounded,primary"
    self.registerButton.mcss.classes = "link"
    view.mcss.id = "login-bg-view"
    self.bottomBar.fixed = true

    ...
}
Know more about component identification
4. Run the MCSS Apply
In each view controller of your app or where you wish to execute MCSS to edit the component of the views you will need to call the apply: in method.
You can send the ViewController as a parameter or a specific component, MCSS will search recursivelly every component inside it and will apply the MCSS rules readed on the MCSS files.
Sending the ViewController guarantees the edition of the tab and main bar besides the components inside the main view. Let's see some examples:
MCSS.shared.apply(in: self)
MCSS.shared.apply(in: self.view)
MCSS.shared.apply(in: otherComponent)
It is recommendable to override the viewDidLayoutSubviews method and call the applied here. But in some cases you could need to call the applier in other instances.
import MCSSFramework
func viewDidLayoutSubviews() {
  ...
  MCSS.shared.apply(in: self)
  ...
}
Java for Android
1. Initialize the Framework
- On the onCreate method of your mainActivity first before other MCSS functions, call the initialize method providing a valid MCSS Application Key (How to get an Application Key?)
public class MainActivity extends AppCompatActivity {
  public static final String MCSS_TOKEN = "YOUR_TOKEN";

  @Override
  protected void onCreate(Bundle savedInstanceState) {
    super.onCreate(saveInstanceState);
    setContentView(R.layout.activity_main);
    MCSS.getInstance().initialize(Contex: this, MCSS_TOKEN);
  }
}
2. Select a Theme and/or create your own MCSS file
MCSS allows you add multiple MCSS files so you can organize your rules as you desire. The rules are going to be applied in the same order as you provide them, but taking in account the CSS priority standards.
In other hand, you can only select one theme for your project but is not necessary select one if you prefer create your own design completely.
If you select a theme and some MCSS files, the order will be the theme first (independent of the order as you added it) and below the list of MCSS files.
Optionally, this method can be called adding the name of one of the themes to be used. After identifying the components in the app by providing classes and ids, the app will adopt the design specified in the selected theme.
Adding a theme
To select a theme you can use the function: useTheme:named indicating the name of the desired theme (View all available themes)
MCSS.getInstance().useTheme(String theme);
Some available theme names are: scarlet, acid, deepblue, love, turquoise.
This method needs to be called in the onCreate() method of the MainActivity after MCSS.getInstance().initialize(Context contex,String token).
public class MainActivity extends AppCompatActivity {
  public static final String MCSS_TOKEN = "YOUR_TOKEN";

  @Override
  protected void onCreate(Bundle savedInstanceState) {
    super.onCreate(saveInstanceState);
    setContentView(R.layout.activity_main);
    MCSS.getInstance().initialize(Contex: this, MCSS_TOKEN);
    MCSS.getInstance().useTheme("scarlet");
  }
}
Adding a local MCSS file
MCSS.getInstance().addStyleSheetFromFile(String file);
- The MCSS file containing the app style instructions needs to be added to the Android project.
- The name of the MCSS file needs to be sent as a parameter e.g. style.mcss.css
- To add the MCSS file to the project (if you use Android Studio), choose on the menu the option File/new/file... select an empty file in the other section and add a name with the extension .mcss.css or drag and drop the mcss file to the project.
- This method can be called multiple times if there are more than one MCSS file, all MCSS files will be combined.
This method in the onCreate() method of the MainActivity after MCSS.getInstance().initialize(Context contex,String token)
public class MainActivity extends AppCompatActivity {
  public static final String MCSS_TOKEN = "YOUR_TOKEN";

  @Override
  protected void onCreate(Bundle savedInstanceState) {
    super.onCreate(saveInstanceState);
    setContentView(R.layout.activity_main);
    MCSS.getInstance().initialize(Contex: this, MCSS_TOKEN);
    MCSS.getInstance().addStyleSheetFromFile("style.mcss.css");
    MCSS.getInstance().addStyleSheetFromFile("fonts.mcss.css");
  }
}
Adding an external MCSS file via URL
MCSS.getInstance().addStyleSheetfromURL(String url);
By using this method, the project can be linked with an external URL where the MCSS files is hosted e.g. https://api.myserver.com/resources/style.mcss.css.
This method can be called multiple times if there are more than one MCSS file, all MCSS files will be combined.
This method needs to be called in the onCreate() method of the MainActivity after MCSS.getInstance().initialize(Context contex,String token).
public class MainActivity extends AppCompatActivity {
  public static final String MCSS_TOKEN = "YOUR_TOKEN";

  @Override
  protected void onCreate(Bundle savedInstanceState) {
    super.onCreate(saveInstanceState);
    setContentView(R.layout.activity_main);
    MCSS.getInstance().initialize(Contex: this, MCSS_TOKEN);
    MCSS.getInstance().addStyleSheetFromUrl("https://myserver.com/resources/style.mcss.css");
  }
}
3. Identify your components
You will need to indicate the classes and ids of your compoents to refer them from the MCSS files and to approach to full the selected theme.
By Id
MCSS.setId(View component,String id)
This method is used to enable or disable component style editing even if the selectors in the MCSS files match the component.
View container=(View)findViewById(R.id.container);
MCSS.setId(container,"id-container");
Example:
public class MainActivity extends AppCompatActivity {
  public static final String MCSS_TOKEN = "YOUR_TOKEN";

  @Override
  protected void onCreate(Bundle savedInstanceState) {
    super.onCreate(saveInstanceState);
    setContentView(R.layout.activity_main);
    MCSS.getInstance().initialize(Contex: this, MCSS_TOKEN);
    TextView textView = (TextView)findViewById(R.id.hellow);
    View container = (View)findViewById(R.id.container);
    MCSS.setId(textView, id: "id-container");
  }
}
By Class
MCSS.addClass(View component, String class)
This method is used to add the class attribute to a component, it is defined as a comma separated list of elements.
View container=(View)findViewById(R.id.container);
MCSS.addClass(container,"red,bold");
Example:
public class MainActivity extends AppCompatActivity {
  public static final String MCSS_TOKEN = "YOUR_TOKEN";

  @Override
  protected void onCreate(Bundle savedInstanceState) {
    super.onCreate(saveInstanceState);
    setContentView(R.layout.activity_main);
    MCSS.getInstance().initialize(Contex: this, MCSS_TOKEN);
    TextView textView = (TextView)findViewById(R.id.hellow);
    View container = (View)findViewById(R.id.container);
    MCSS.addClass(container, class: "red, bold");
  }
}
Block some components
MCSS.immutable(View component,boolean inmutable)
This method is used to enable or disable component style editing even if the selectors in the MCSS files match the component.
Example:
TextView textView=(TextView)findViewById(R.id.comments);
MCSS.immutable(textView,true);
4. Run the MCSS Apply
MCSS.getInstance().apply(View view)
This method can recursively find all components inside a view and add the correspondent design based on the MCSS rules provided in the MCSS files, normally the developer can indicate as parameter the main view of a view controller and the apply function will access all of the other components, but depending on the needs, the developer would send particular components as buttons or textviews.
It is recommended to be used in the onCreate() method of the correspondent view.
public class MainActivity extends AppCompatActivity {
  public static final String MCSS_TOKEN = "YOUR_TOKEN";

  @Override
  protected void onCreate(Bundle savedInstanceState) {
    super.onCreate(saveInstanceState);
    setContentView(R.layout.activity_main);
    MCSS.getInstance().initialize(Contex: this, MCSS_TOKEN);
    LinearLayout content = (LinearLayout)findViewById(R.id.content);
    MCSS.getInstance().apply(content);
  }
}